
IPython Jupyter on EC2 for HPC, Part 1
NOTE: I’ve made my AMI created using this procedure available publicly! If you want to get going with IPython/Jupyter on EC2 super quickly and with minimal terminal see my guide here.
I attempted to use random forests as a first pass for The Winton Stock Market Challenge on Kaggle and found that for any reasonable number of trees in the forest, I was unable to train the data in a reasonable amount of time. Even though the solution itself was extremely unsuccessful, here’s a short guide on how to do set up an EC2 instance to do large computations using Jupyter.
One of the great features about EC2 is you are able to resize your instance type at any time. Find out that you need more RAM, more cores or speed? Resizing the instance can be done with one command (full instance type listing here):
$ ec2-modify-instance-attribute i-10a64379 --instance-type m1.small
I’ll show you how to do it using the EC2 CLI so almost everything can be done from the terminal. I’ve also made my AMI available so you can get going super quickly on using Jupyter/iPython on an EC2 instance.
This procedure has been tested on Linux Mint 17.2 using Chromium 48.
#Preliminaries ##Create Security Keys Copied from here.
-
Open the IAM console.
-
In the navigation pane, choose Users.
-
Choose your IAM user name (not the check box).
-
Choose the Security Credentials tab and then choose Create Access Key.
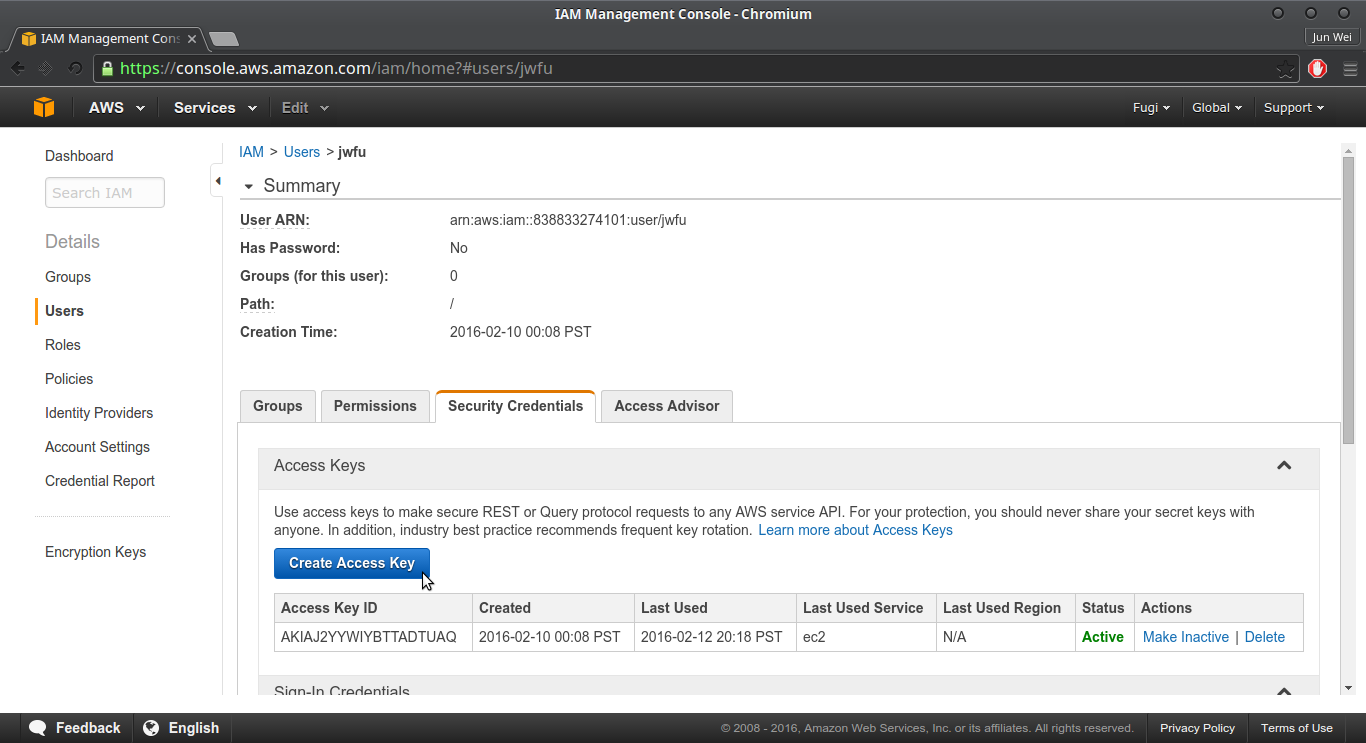
- To see your access key, choose Show User Security Credentials. Your credentials will look something like this:
Access Key ID: AKIAIOSFODNN7EXAMPLE
Secret Access Key: wJalrXUtnFEMI/K7MDENG/bPxRfiCYEXAMPLEKEY
- Choose Download Credentials, and store the keys in a secure location.
Your secret key will no longer be available through the AWS Management Console; you will have the only copy. Keep it confidential in order to protect your account, and never email it. Do not share it outside your organization, even if an inquiry appears to come from AWS or Amazon.com. No one who legitimately represents Amazon will ever ask you for your secret key.
##Attach Managed Policies
Copied from here
-
Sign in to the AWS Management Console and open the IAM console at https://console.aws.amazon.com/iam/.
-
In the navigation pane, choose Policies.
-
Filter ‘AdministratorAccess’ and select.
-
Choose the Attached Entities Tab, and select Attach.
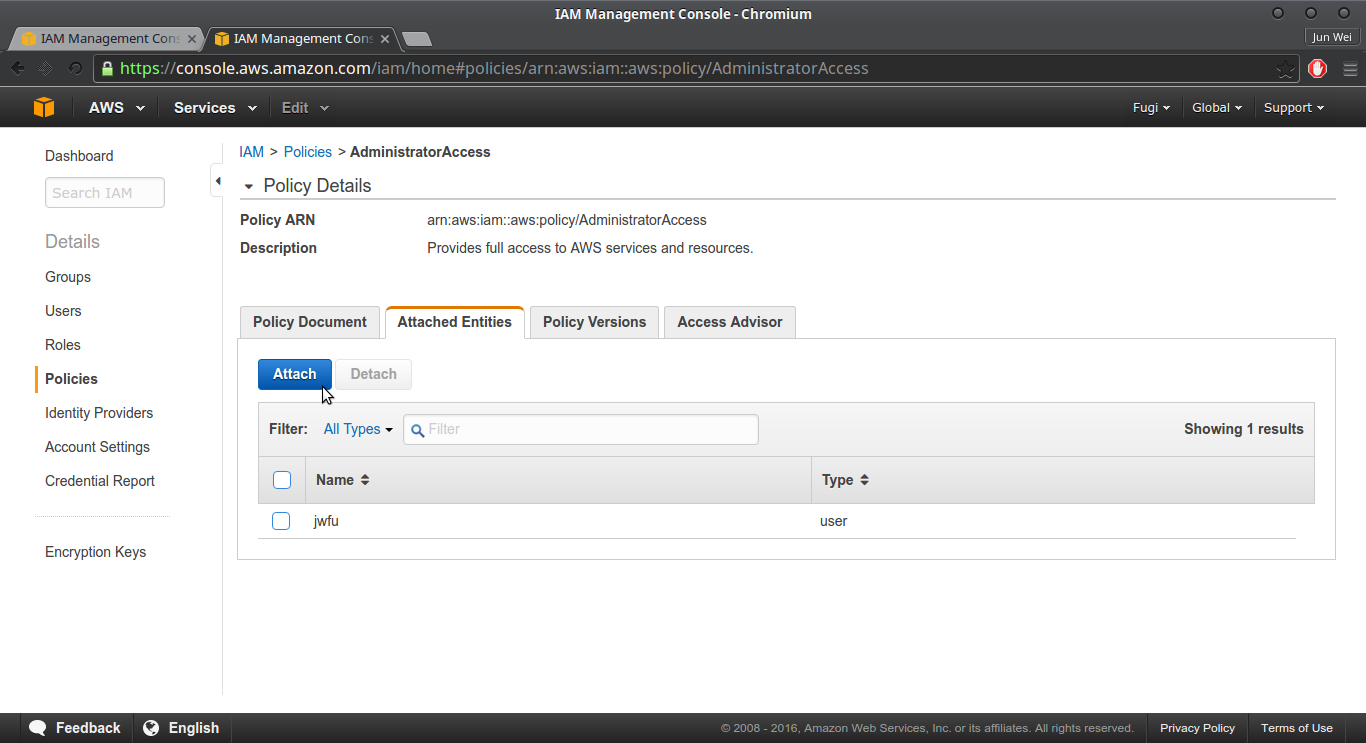
- Select the user name you created before and choose Attach Policy
##Install EC2 CLI tools.
Copied from here. On Linux Mint, Java appears to be configured correctly already so you can skip that part.
First install ec2-api-tools
$ sudo apt-get install ec2-api-tools
The easiest way to provide your access keys to the Amazon EC2 CLI is to set the AWS_ACCESS_KEY and AWS_SECRET_KEY environment variables. First, add the following lines to ~/.bashrc and save the file.
export AWS_ACCESS_KEY=your-aws-access-key-id
export AWS_SECRET_KEY=your-aws-secret-key
After you’ve updated ~/.bashrc, run the following command:
source ~/.bashrc
To verify that your CLI tools are set up correctly, run the following command:
ec2-describe-regions
If your environment variables are set correctly, the output lists regions and their corresponding service endpoints.
By default, the Amazon EC2 CLI tools use the US East (Northern Virginia) region (us-east-1) with the ec2.us-east-1.amazonaws.com service endpoint URL. To access a different region with the CLI tools, you must set the EC2_URL environment variable to the proper service endpoint URL.
To set the service endpoint URL
-
To list your available service endpoint URLs, call the ec2-describe-regions command.
-
Set the EC2_URL environment variable using the service endpoint URL returned from the ec2-describe-regions command as follows:
export EC2_URL=https://<service_endpoint>
#Create Keypairs
Copied from here
ec2-create-keypair jupyter-key
The following is example output:
KEYPAIR	my-key-pair	1f:51:ae:28:bf:89:e9:d8:1f:25:5d:37:2d:7d:b8:ca:9f:f5:f1:6f
---- BEGIN RSA PRIVATE KEY ----
MIICiTCCAfICCQD6m7oRw0uXOjANBgkqhkiG9w0BAQUFADCBiDELMAkGA1UEBhMC
VVMxCzAJBgNVBAgTAldBMRAwDgYDVQQHEwdTZWF0dGxlMQ8wDQYDVQQKEwZBbWF6
b24xFDASBgNVBAsTC0lBTSBDb25zb2xlMRIwEAYDVQQDEwlUZXN0Q2lsYWMxHzAd
BgkqhkiG9w0BCQEWEG5vb25lQGFtYXpvbi5jb20wHhcNMTEwNDI1MjA0NTIxWhcN
MTIwNDI0MjA0NTIxWjCBiDELMAkGA1UEBhMCVVMxCzAJBgNVBAgTAldBMRAwDgYD
VQQHEwdTZWF0dGxlMQ8wDQYDVQQKEwZBbWF6b24xFDASBgNVBAsTC0lBTSBDb25z
b2xlMRIwEAYDVQQDEwlUZXN0Q2lsYWMxHzAdBgkqhkiG9w0BCQEWEG5vb25lQGFt
YXpvbi5jb20wgZ8wDQYJKoZIhvcNAQEBBQADgY0AMIGJAoGBAMaK0dn+a4GmWIWJ
21uUSfwfEvySWtC2XADZ4nB+BLYgVIk60CpiwsZ3G93vUEIO3IyNoH/f0wYK8m9T
rDHudUZg3qX4waLG5M43q7Wgc/MbQITxOUSQv7c7ugFFDzQGBzZswY6786m86gpE
Ibb3OhjZnzcvQAaRHhdlQWIMm2nrAgMBAAEwDQYJKoZIhvcNAQEFBQADgYEAtCu4
nUhVVxYUntneD9+h8Mg9q6q+auNKyExzyLwaxlAoo7TJHidbtS4J5iNmZgXL0Fkb
FFBjvSfpJIlJ00zbhNYS5f6GuoEDmFJl0ZxBHjJnyp378OD8uTs7fLvjx79LjSTb
NYiytVbZPQUQ5Yaxu2jXnimvw3rrszlaEXAMPLE
-----END RSA PRIVATE KEY-----
Make a note of the fingerprint for the private key of the key pair displayed on the first line. You can use the fingerprint to verify that your private key is a correct match with the public key stored in AWS. You do this by comparing the fingerprint for the private key with the fingerprint of the public key. They should be identical.
Create a file named jupyter-key.pem and paste the entire key, including the following lines:
----BEGIN RSA PRIVATE KEY----
-----END RSA PRIVATE KEY-----
Save the file with ASCII encoding so that it can be read by an SSH client when you connect to your instance.
If you’re using an SSH client on a Linux computer to connect to your instance, use the following command to set the permissions of your private key file so that only you can read it.
chmod 400 jupyter-key.pem
#Create Security Group
$ ec2-create-group jupyter-group -d "jupyter ec2"
GROUP	sg-1ba4787c	jupyter-group	jupyter ec2
##Add Permissions We need to set up our instance to allow connections on 22 for SSH, 443 for HTTPS, and 8888 for Jupyter:
$ ec2-authorize jupyter -p 22
GROUP			jupyter
PERMISSION		jupyter	ALLOWS	tcp	22	22	FROM	CIDR	0.0.0.0/0	ingress
$ ec2-authorize jupyter -p 443
^[[A^[[BGROUP			jupyter
PERMISSION		jupyter	ALLOWS	tcp	443	443	FROM	CIDR	0.0.0.0/0	ingress
$ ec2-authorize jupyter -p 8888
GROUP			jupyter
PERMISSION		jupyter	ALLOWS	tcp	8888	8888	FROM	CIDR	0.0.0.0/0	ingress
#Launch Instance
We’re finally ready to launch the instance! This will create at t2.micro instance which is inside the free tier with a vanilla Ubuntu AMI on a 15GB partition. Full documentation for this command is here
$ ec2-run-instances ami-9abea4fb -t t2.micro -k jupyter-key -g jupyter-group -b "/dev/sda1=snap-306df873:15"
RESERVATION	r-045652d2580a387d8	838833274101
INSTANCE	i-0b6da661863fb4b16	ami-9abea4fb		ip-172-31-19-211.us-west-2.compute.internal	pending	jupyter-key	0		t2.micro2016-02-12T22:03:22+0000	us-west-2a				monitoring-disabled		172.31.19.211	vpc-fb25299e	subnet-3ee5f65b	ebs	hvm	xen		sg-1ba4777c	default	false
NIC	eni-47563e3f	subnet-3ee5f65b	vpc-fb25299e	838833274101	in-use	172.31.19.211	ip-172-31-19-211.us-west-2.compute.internal	true
NICATTACHMENT	eni-attach-29f7c423	0	attaching	2016-02-12T14:03:22-0800	true
GROUP	sg-1ba4777c	jupyter-group
PRIVATEIPADDRESS	172.31.19.211	ip-172-31-19-211.us-west-2.compute.internal
#SSH In
When you run an instance, you will have to wait a bit before it goes pending to running. You can see if its running with the ec2-describe-instances -F "instance-state-name=running" command.
 $ ec2-describe-instances -F "instance-state-name=running"
RESERVATION	r-045652d2580a387d8	838833274101
INSTANCE	i-0b6da661863fb4b16	ami-9abea4fb	ec2-54-213-180-27.us-west-2.compute.amazonaws.com	ip-172-31-19-211.us-west-2.compute.internal	running	jupyter-key	0		t2.micro	2016-02-12T22:03:22+0000	us-west-2a				monitoring-disabled	54.213.180.27	172.31.19.211	vpc-fb25299esubnet-3ee5f65b	ebs					hvm	xen		sg-1ba4777c	default	false
BLOCKDEVICE	/dev/sda1	vol-d3678a25	2016-02-12T22:03:26.000Z	true
NIC	eni-47563e3f	subnet-3ee5f65b	vpc-fb25299e	838833274101	in-use	172.31.19.211	ip-172-31-19-211.us-west-2.compute.internal	true
NICATTACHMENT	eni-attach-29f7c423	0	attached	2016-02-12T14:03:22-0800	true
NICASSOCIATION	54.213.180.27	amazon	172.31.19.211
GROUP	sg-1ba4777c	jupyter-group
PRIVATEIPADDRESS	172.31.19.211	ip-172-31-19-211.us-west-2.compute.internal	ec2-54-213-180-27.us-west-2.compute.amazonaws.com
The very last part of this (ec2-54-213-180-27.us-west-2.compute.amazonaws.com) is the public DNS. You will need this to SSH into the instance. Full guide is here
$ ssh -i "jupyter-key.pem" ubuntu@ec2-54-213-180-27.us-west-2.compute.amazonaws.com
The authenticity of host 'ec2-54-213-180-27.us-west-2.compute.amazonaws.com (54.213.180.27)' can't be established.
ECDSA key fingerprint is 59:a7:d8:bd:65:ff:62:64:8c:13:c3:18:03:ec:9b:e5.
Are you sure you want to continue connecting (yes/no)? yes
Warning: Permanently added 'ec2-54-213-180-27.us-west-2.compute.amazonaws.com,54.213.180.27' (ECDSA) to the list of known hosts.
Welcome to Ubuntu 14.04.3 LTS (GNU/Linux 3.13.0-74-generic x86_64)
##Install Anaconda For this, I’m tremendously indebted to Piyush’s guide here. When ipython prompts you to enter a password, the AMI I have made public has the default password as ‘ec2jupyer’ which is hashed below.
$ wget https://3230d63b5fc54e62148e-c95ac804525aac4b6dba79b00b39d1d3.ssl.cf1.rackcdn.com/Anaconda3-2.5.0-Linux-x86_64.sh
$ bash Anaconda3-2.5.0-Linux-x86_64.sh
$ source .bashrc
$ ipython
In [1]:from IPython.lib import passwd
In [2]:passwd()
Enter password:
Verify password:
Out[2]: 'sha1:1596aa4f3913:daa677b8786b0f916b6716cd8a9c08dce8cb9217'
In [3]: exit
$ jupyter notebook --generate-config
$ mkdir certs
$ cd certs
$ sudo openssl req -x509 -nodes -days 365 -newkey rsa:1024 -keyout mycert.pem -out mycert.pem
..........++++++
.......................++++++
writing new private key to 'mycert.pem'
-----
You are about to be asked to enter information that will be incorporated
into your certificate request.
What you are about to enter is what is called a Distinguished Name or a DN.
There are quite a few fields but you can leave some blank
For some fields there will be a default value,
If you enter '.', the field will be left blank.
-----
Country Name (2 letter code) [AU]:
State or Province Name (full name) [Some-State]:
Locality Name (eg, city) []:
Organization Name (eg, company) [Internet Widgits Pty Ltd]:
Organizational Unit Name (eg, section) []:
Common Name (e.g. server FQDN or YOUR name) []:
$ cd ~/.jupyter/
$ nano jupyter_notebook_config.py
In the opened text file add the following lines:
c = get_config()

# Kernel config
c.IPKernelApp.pylab = 'inline'  # if you want plotting support always in your notebook

# Notebook config
c.NotebookApp.certfile = u'/home/ubuntu/certs/mycert.pem' #location of your certificate file
c.NotebookApp.ip = '*'
c.NotebookApp.open_browser = False  #so that the ipython notebook does not opens up a browser by default
c.NotebookApp.password = u'sha1:1596aa4f3913:daa677b8786b0f916b6716cd8a9c08dce8cb9217'  #the encrypted password we generated above
# It is a good idea to put it on a known, fixed port
c.NotebookApp.port = 8888
Save and exit, then enter the following commands:
$ cd ~
$ mkdir Notebooks
$ cd Notebooks
#What’s Next? You’ve now finished setting up a (hopefully) fully functional EC2 instance. Check out Part 2 to see how to get Jupyter running in your browser and upload your notebooks and datasets!